2
ASUS High-Speed CD-ROM Drive User’s Manual
I. HARDWARE INSTALLATION
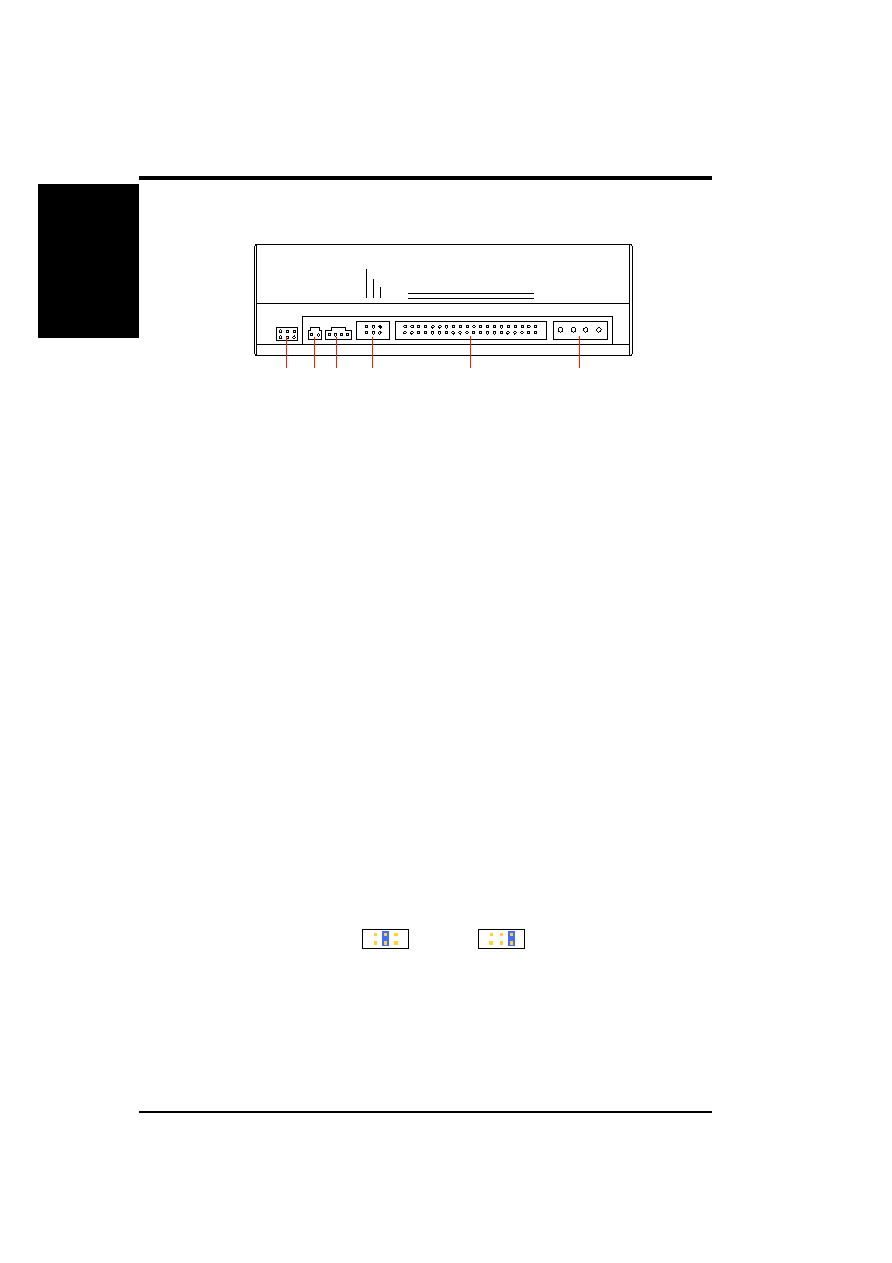
Rear Panel Features
+5V
O
G
O
G
O
+12V
O
DIGITAL
AUDIO
D
O
G
O
ANALOG
AUDIO
CABLE SELECT
SLAVE
MASTER
OO
O
39
40
1
2
IDE INTERFACE
POWER
G
O
R
O
G
O
L
O
D: Digital; G: Ground; R: Right audio channel; L: Left audio channel
NOTE: The pin settings or definitions of the connectors and jumpers are also engraved on
the Rear Panel of your CD-ROM Drive.
Power Supply connector connects to the computer’s power supply.
IDE Interface connector connects to a 40-pin IDE interface cable. Make sure that the red
stripe on the cable is oriented with Pin 1 of the CD-ROM Drive’s IDE Interface connector.
Device configuration jumper allows you to set your CD-ROM Drive as the Master or
Slave drive. The default setting is Slave, wherein the jumper is on “SLAVE”. “CABLE SE-
LECT” is reserved and should not be used.
Analog Audio line out connector has two channels, right (“R”) and left (“L”) audio out-
puts, and allows you to direct audio output from your CD-ROM Drive to your sound card, if
available, when connected using a CD audio cable. “G” is for Ground.
NOTES: (1) If the pin definitions on your sound card are not the same as that on your CD-
ROM Drive, check with your dealer for a compatible cable; (2) If you do not have a sound
card, plug earphones, headphones, or powered/self-amplified speakers to the Headphones
Jack on your CD-ROM’s front panel (see Front Panel Controls). Set the volume controls of
your drive and powered/self-amplified speakers to minimum before starting or restarting your
computer. This is to prevent possible damage to the earphones, headphones, or speakers.
Digital Audio output connector offers high quality audio effect by outputting digital signal to a
D/A converter or for recording to a digital audio tape (DAT) or professional audio recording
system. The connector follows the EBU-IEC958 standard set by the European Broadcast Union.
Testing jumpers are reserved for manufacturer’s internal testing/diagnostic purposes.
Installing Your CD-ROM Drive
Before installing your CD-ROM Drive into your computer (see Quick Installation Guide
for instructions on installing your CD-ROM Drive), set your drive as either the Master or
Slave (default) drive by placing the jumper cap on the desired jumper .
Slave Drive (Default)
Master Drive
NOTE: If your computer only allows you to connect a maximum of two devices and you
have two hard disks, remove the Slave hard disk—you need the other IDE connector for
your CD-ROM Drive. If you only have one hard disk, set your CD-ROM Drive as Slave. If
your computer has two IDE connectors and two hard disks installed, either set your CD-
ROM Drive as Master on the secondary IDE connector or remove the Slave hard disk and
replace it with your CD-ROM Drive. Refer to your computer’s manual for your system’s
configuration and instructions on hardware installation.
I.H/W
INST
ALLA
TION
Rear
Panel/Setting

